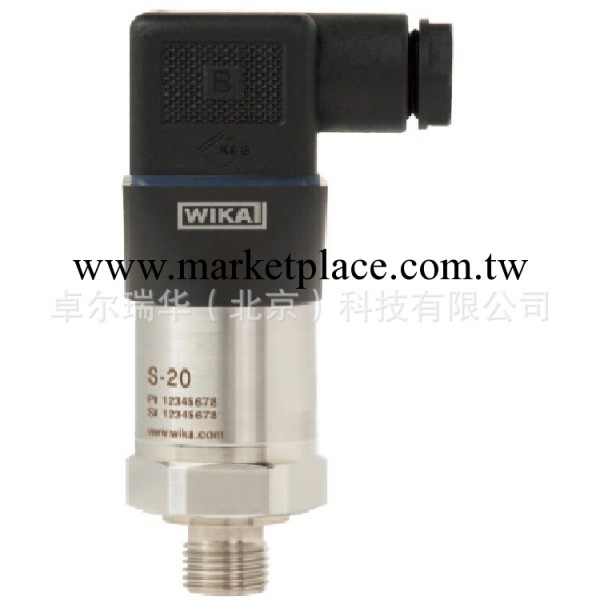
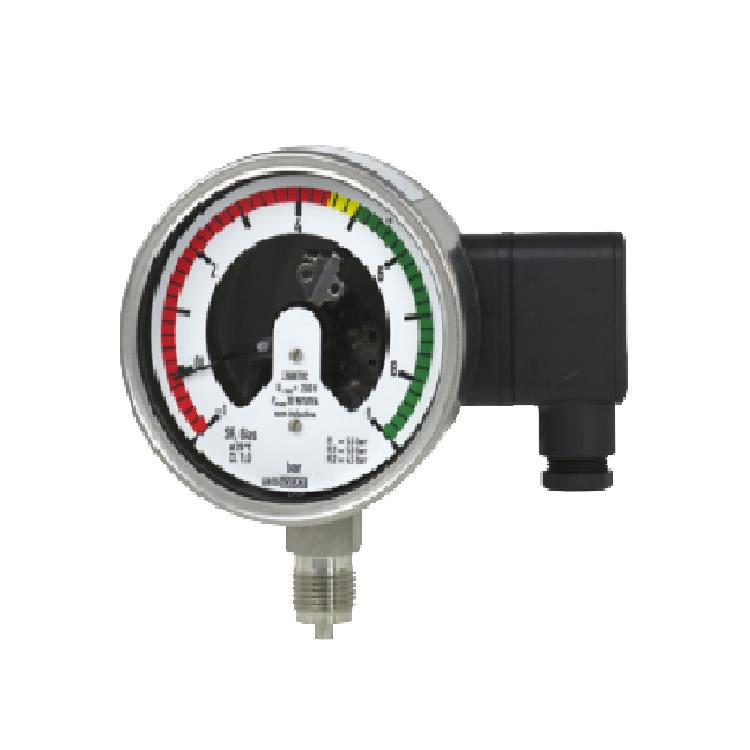
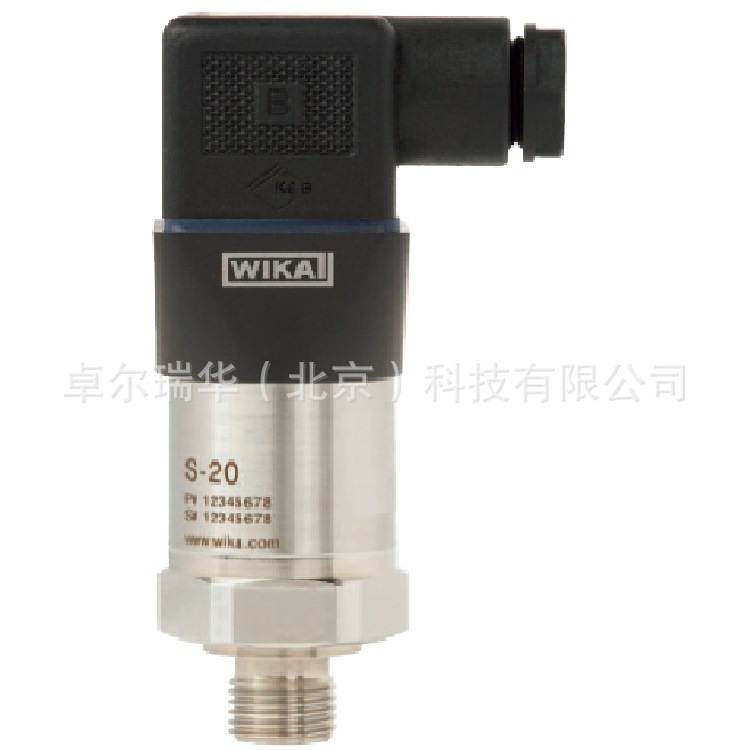
WIKA S-20 高精度 高壓力范圍 壓力變送器
精度:0.125 1600bar
Superior pressure transmitter for general industrial applications
Model S-20
Applications
Critical industrial applications
Demanding applications in research and development
Harsh environments in the process industry
Special features
Measuring ranges from 0 ... 0.4 to 0 ... 1,600 bar
Non-linearity of up to 0.125 % of span
Different output signals, e.g. 4 ... 20 mA, DC 0 ... 10 V,
DC 1 ... 5 V and others
Market-standard electrical connections, e.g.
DIN 175301-803 A angular connector
Common international process connections
Description
The model S-20 pressure transmitter for general industrial applications is the ideal solution for customers with demanding measuring requirements. It features a very good accuracy, a robust design and an exceptional number of variants, meaning it can be suited to the widest range of applications.
Versatile
The model S-20 offers continuous measuring ranges between 0 ... 0.4 and 0 ... 1,600 bar in all the major units.
These measuring ranges can be combined in almost any way with all the standard industry output signals, the most common international process connections and a wide number of electrical connections.
Furthermore, it offers numerous options, such as different accuracy classes, extended temperature ranges and customer-specific pin assignments.
High quality
The robust design turns the model S-20 into a very high quality product, which even the most adverse environmental conditions cannot affect. Whether with the lowest temperatures when used outdoors, with extreme shock and vibration in machine building or with aggressive media in the chemical industry, this transmitter can meet all requirements.
Availability
All variants described in this data sheet are available on very short lead times. For particularly urgent demands, there is a sizeable stock available.
Measuring ranges
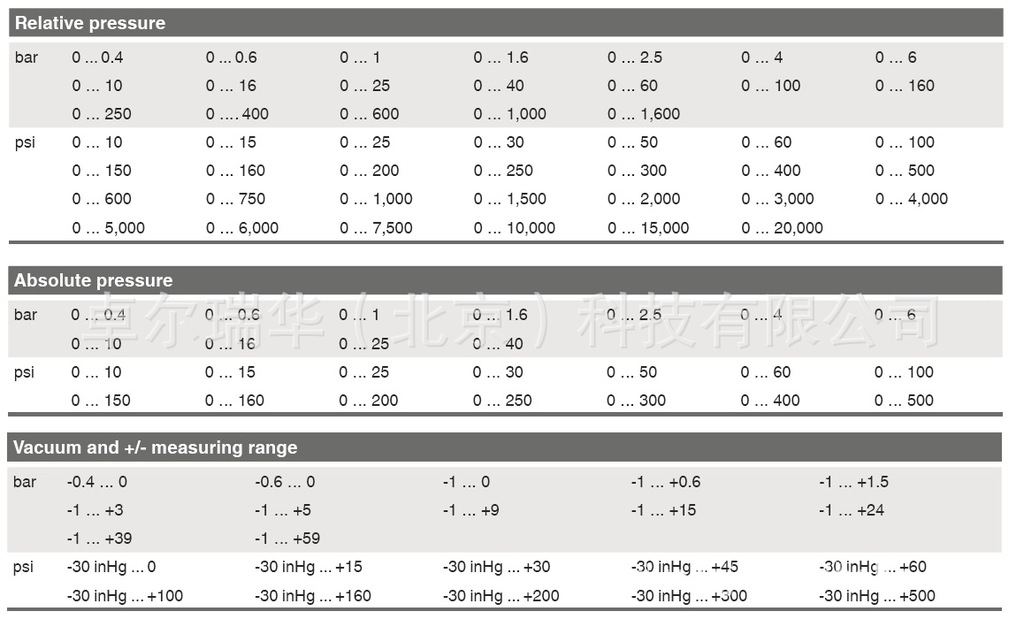
The given measuring ranges are also available in kg/cm2, kPa and MPa.
Special measuring ranges between 0 ... 0.4 and 0 ... 1,600 bar are available on request.
Special measuring ranges have a reduced long-term stability and increased temperature errors.
Overpressure limit
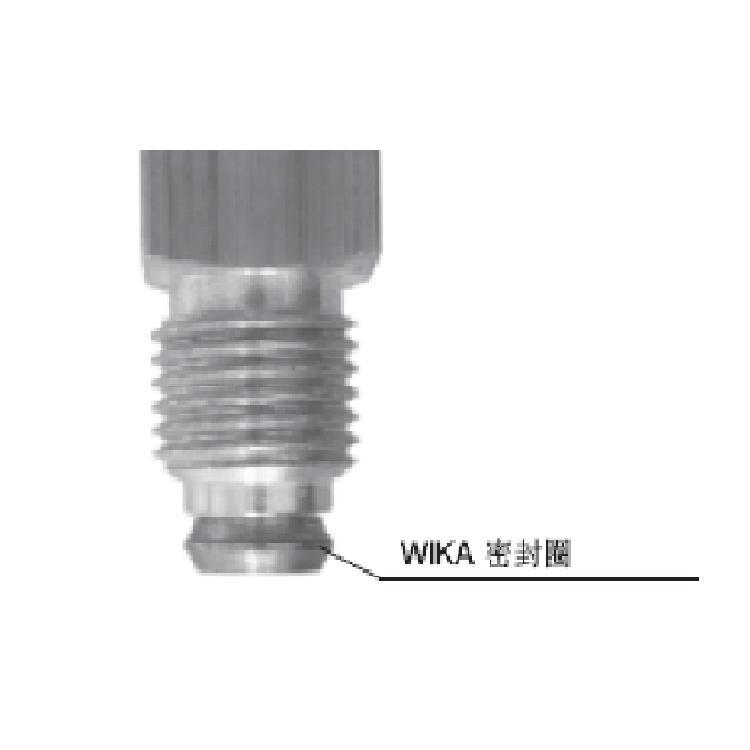
The overpressure limit is based on the sensor element used. Depending on the selected process connection and sealing, restrictions in overpressure safety can result. A higher overpressure limit will result in a higher temperature error.

Measuring range < 10 bar/150 psi ≥ 10 bar/150 psi
3 times (standard) 2 times 1) (standard)
5 times 3 times 2) 3)
1) Restriction: max. 60 bar/870 psi with absolute pressure
2) only possible for relative pressure measuring ranges ≤ 400 bar or 5,800 psi
3) only possible for absolute pressure measuring ranges < 16 bar or 220 psi
Vacuum tightness
Yes
Output signal
Signal type Signal
Current (2-wire) 4 ... 20 mA
20 ... 4 mA
Voltage (3-wire) DC 0 ... 10 V
DC 0 ... 5 V
DC 1 ... 5 V
DC 0.5 ... 4.5 V
DC 1 ... 6 V
DC 10 ... 0 V
Ratiometric (3-wire) DC 0.5 ... 4.5 V
Other output signals on request.
Permissible load in Ω
Current output (2-wire): ≤ (power supply - 7.5 V) / 0.023 A
≤ (power supply - 11.5 V) /
0.023 A (with optional settling time of 1 ms)
Voltage output (3-wire): > maximum output voltage / 1 mA
Ratiometric output (3-wire): > 4.5k
Signal limiting (option)
4 ... 20 mA: Zero point: 3.6 mA 1), 3.8 mA, 4.0 mA
Full scale: 20 mA, 21.5 mA, 23 mA
DC 0 ... 10 V: Full scale: DC 10 V, DC 11.5 V
1) Not possible in combination with zero point adjustment by the customer
Voltage supply
Maximum power supply for cULus approval: DC 35 V (DC 32 V with heavy-duty connector)
Current output (2-wire)
4 ... 20 mA: DC 8 ... 36 V (DC 12 ... 36 V with optional settling time of 1 ms)
20 ... 4 mA (inverted): DC 8 ... 36 V
Voltage output (3-wire)
DC 0 ... 10 V: DC 12 ... 36 V
DC 0 ... 5 V: DC 8 ... 36 V
DC 1 ... 5 V: DC 8 ... 36 V
DC 0.5 ... 4.5 V: DC 8 ... 36 V
DC 1 ... 6 V: DC 9 ... 36 V
DC 10 ... 0 V: DC 12 ... 36 V
Ratiometric output (3-wire):
DC 0.5 ... 4.5 V: DC 5 V ±10 %
Dissipation loss
Current output (2-wire): 828 mW (22 mW/K derating of the dissipation loss with ambient temperatures ≥ 100 °C)
Voltage output (3-wire): 432 mW
Current supply
Current output (2-wire): Current signal, max. 25 mA
Voltage output (3-wire): max. 12 mA
Reference conditions (per IEC 61298-1)
Temperature
15 ... 25 °C
Atmospheric pressure
860 ... 1,060 mbar
Humidity
45 ... 75 % relative
Power supply
DC 24 V
DC 5 V with ratiometric output
Mounting position
Calibrated in vertical mounting position with pressure connection facing downwards.
Time response 
1) 3 dB limit frequency: 500 Hz
2) 3 dB limit frequency: 1,000 Hz
3) Alternative specifications for 4 ... 20 mA output signal:
Load: ≤ (power supply - 11.5 V) / 0.023 A
Power supply: DC 12 ... 36 V
150 ms
Switch-on drift
5 s (60 s with optional zero point adjustment 0.1 %)
Accuracy data
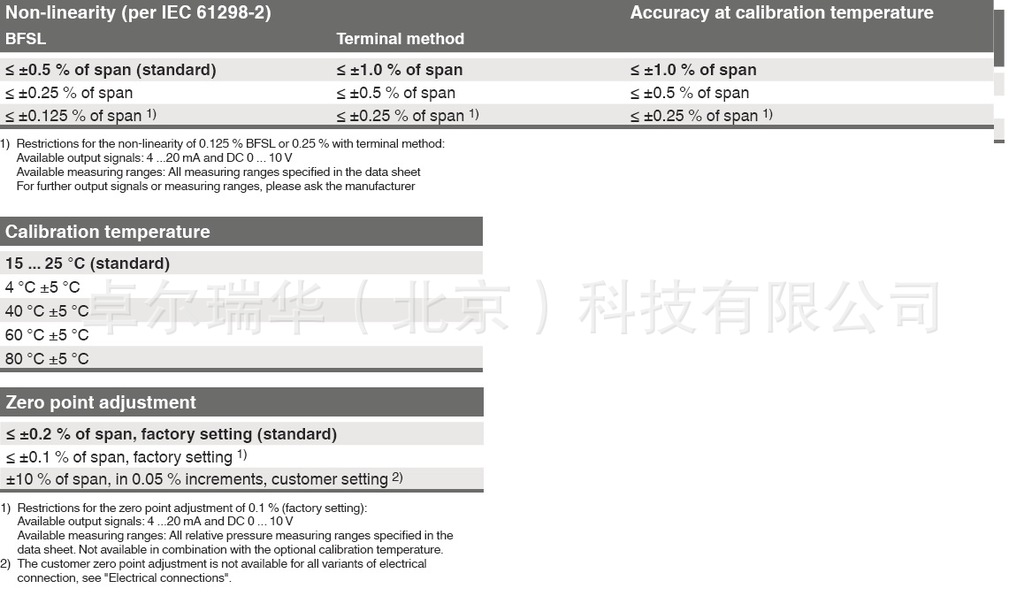
Relationship to the mounting position
For measuring ranges < 1 bar/15 psi, an additional zero offset of up to 0.15 %applies
Non-repeatability
≤ ±0.1 % of span
Temperature hysteresis
0.1 % of span at > 80 °C
Long-term drift (per IEC 61298-2)
≤ ±0.1 % of span
≤ ±0.2 % of span (with special measuring ranges)
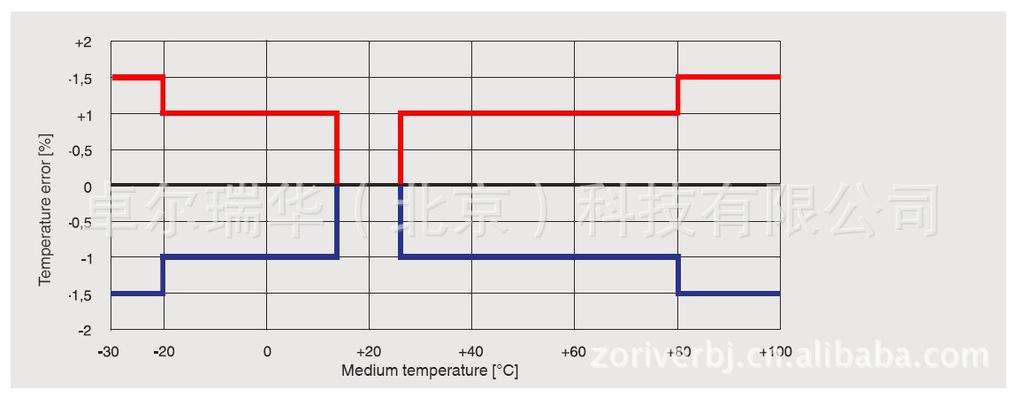
Temperature error (for calibration temperature of 15 ... 25 °C)
For measuring ranges < 1 bar, special measuring ranges and instruments with an increased overpressure limit the respective temperature error increases by 0.5 % of span
Operating conditions
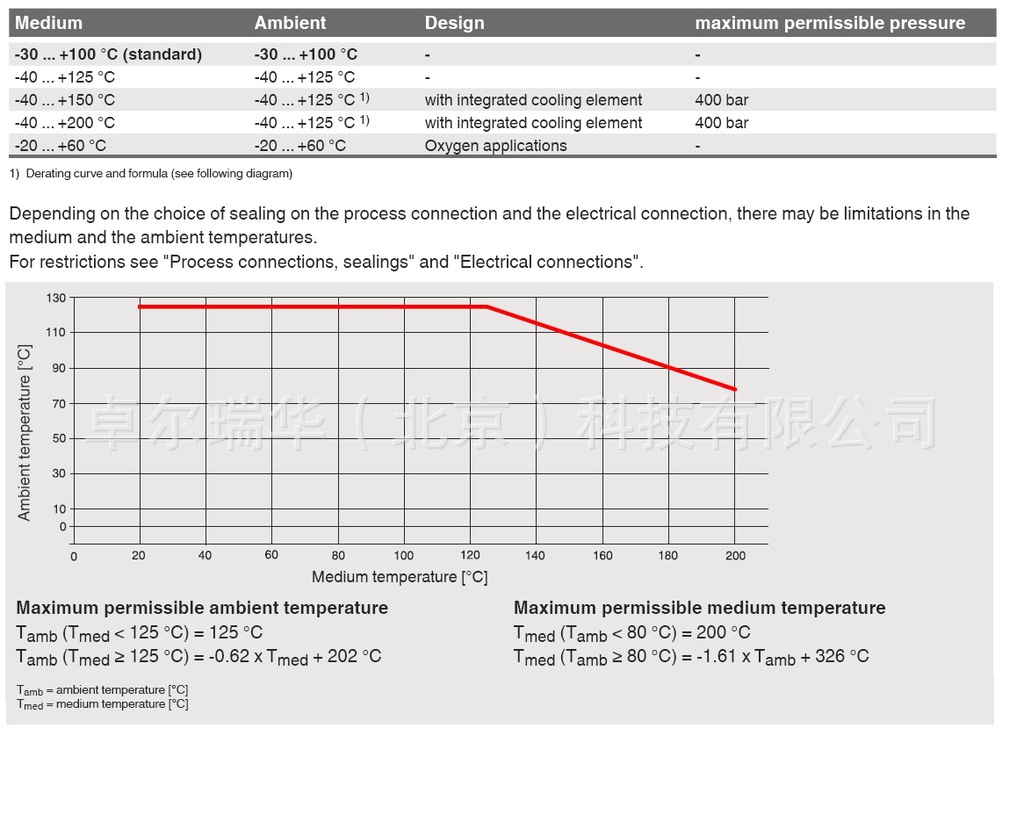
Permissible temperature ranges
Storage and transport conditions
Permissible temperature range: -40 ... +70 °C
Maximum humidity (per IEC 68-2-78): 67 % r.h. at 40 °C (in accordance with 4K4H per EN 60721-3-4)
Climate class
Storage: 1K3 (per EN 60721-3-1)
Transport: 2K2 (per EN 60721-3-2)
Operation: 4K4H (per EN 60721-3-4, without condensation or icing)
Vibration resistance (per IEC 68-2-6)
20 g, 10 ... 2,000 Hz, (40 g, 10 ... 2,000 Hz for heavy-duty connector)
For instruments with cooling elements a limited vibration resistance applies 10 g (10 ... 2,000 Hz)
Continuous vibration resistance (per IEC 68-2-6)
10 g
Shock resistance (per IEC 68-2-27)
100 g, 6 ms (500 g, 1 ms for heavy-duty connector)
Service life
100 million load cycles (10 million load cycles for measuring ranges > 600 bar/7,500 psi)
Free-fall test (following IEC 60721-3-2)
Individual packaging: 1.5 m
Multiple packaging: 0.5 m
PE bag: 0.5 m
Process connections
Available connections
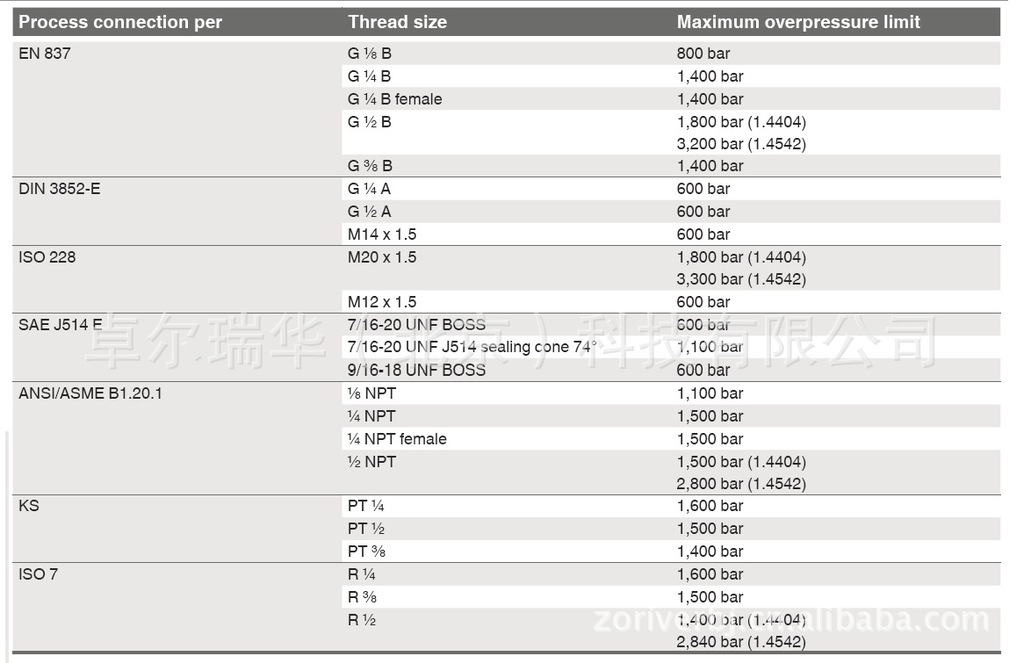
Other process connections on request.
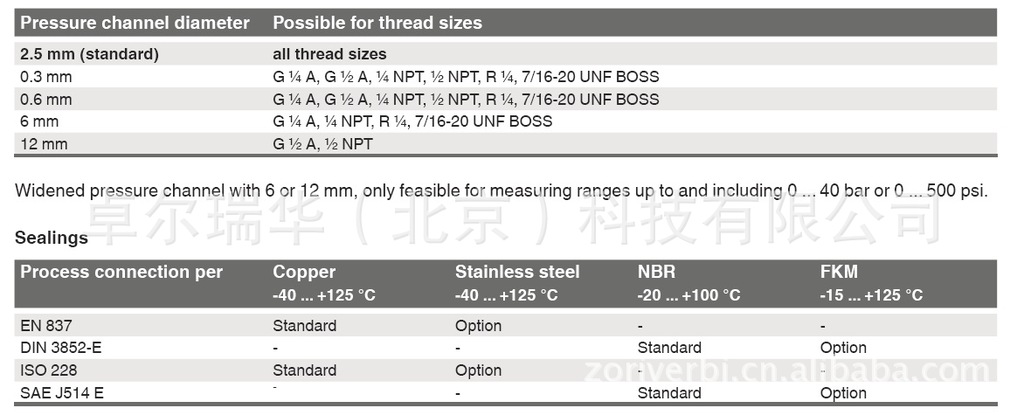
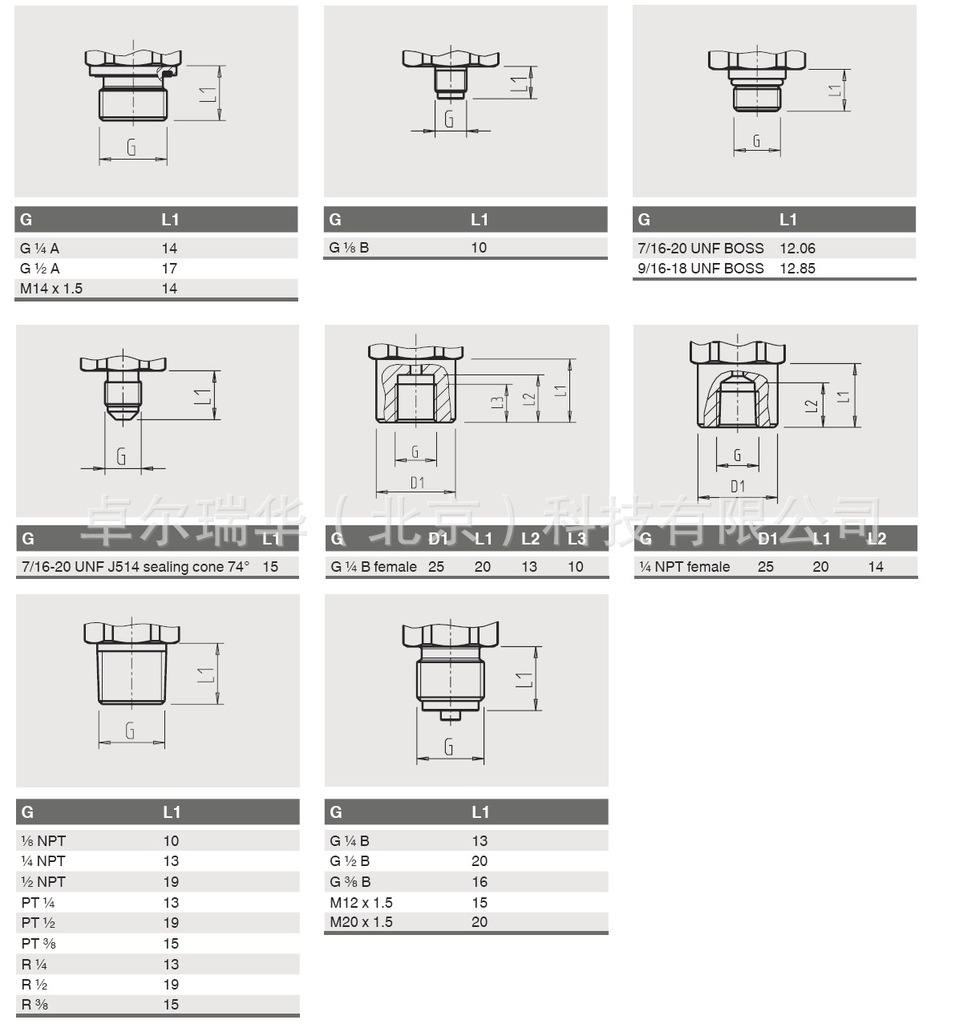
Process connections
Electrical connections
Available connections
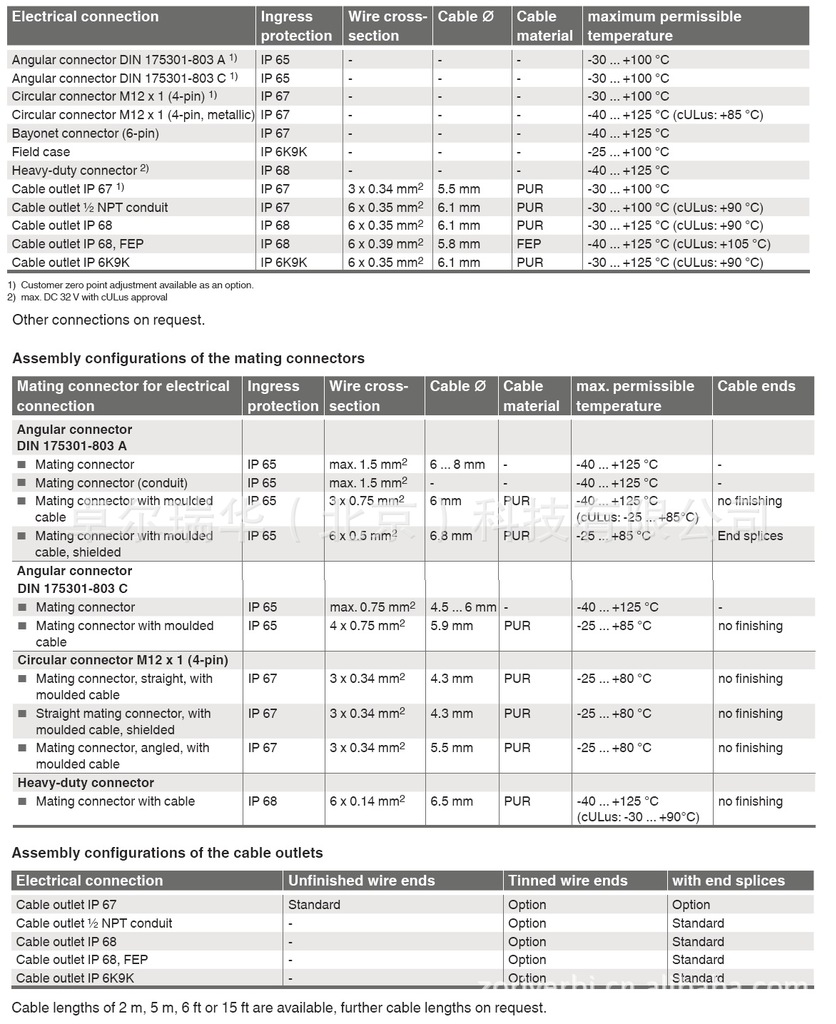
Connection diagrams
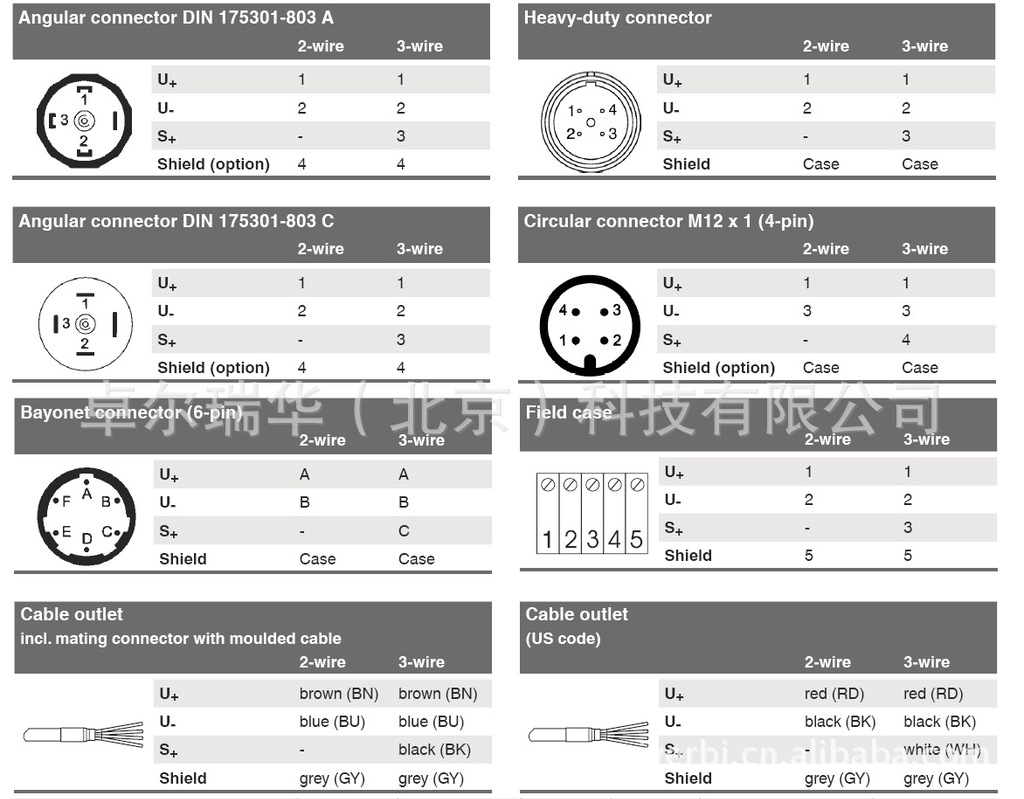
Other pin assignments on request.
The electrical protective measures are not valid for ratiometric output signals.
Short-circuit resistance: S+ vs. U-
Reverse polarity protection: U+ vs. U-
Resistance to overvoltage: DC 40 V
Insulation voltage: DC 750 V
Materials
Wetted parts
Relative measuring ranges:
- Measuring ranges ≤ 10 bar/150 psi: 316L
- Measuring ranges > 10 bar/150 psi: 316L + 13-8 PH
Absolute pressure measuring ranges:
- Measuring ranges ≤ 1,000 bar/10,000 psi: ASTM 630 and 13-8 PH
- Measuring ranges > 1,000 bar/10,000 psi: 316L + 13-8 PH
Sealing materials: see "Process connections"
Non-wetted parts
Case: 316 Ti
Zero point adjustment ring: PBT/PET GF30
Electrical connections:
Angular connector DIN 175301-803 A: PBT/PET GF30
Angular connector DIN 175301-803 C: PBT/PET GF30
Circular connector M12 x 1 (4-pin): PBT/PET GF30
Circular connector M12 x 1 (4-pin, metallic): 316L
Bayonet connector (6-pin) 316L + Al
Field case: 316L, 316Ti
Heavy-duty connector: 316L
Cable outlet IP 67: PA66
Cable outlet ½ NPT conduit: 316L
Cable outlet IP 68: 316L
Cable outlet IP 68, FEP: 316L
Cable outlet IP 6K9K: 316L
Pressure transmission fluid
Synthetic oil (for measuring ranges < 10 bar/150 psi relative and absolute pressure)
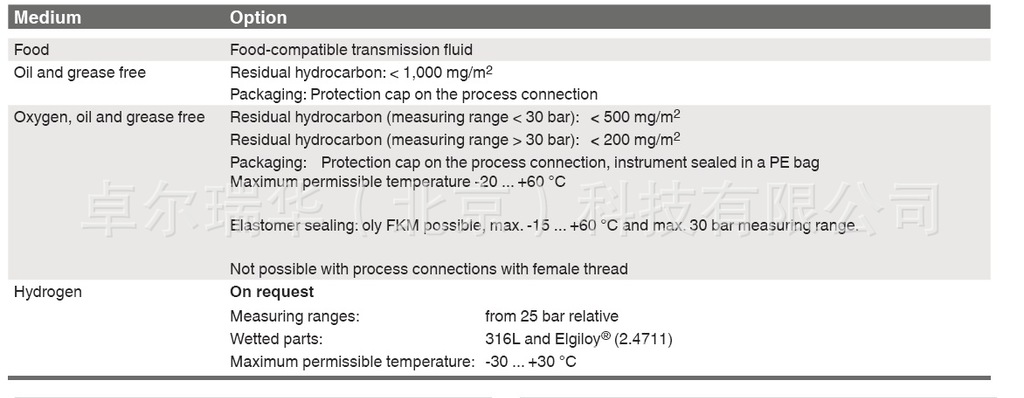
Options for specific media
CE conformity
Pressure equipment directive
97/23/EC
EMC directive
2004/108/EC, EN 61326 emission (group 1, class B) and interference immunity (industrial application)
EM field
30 V/m (80 ... 1,000 Mhz)
RoHS conformity
Directive 2002/95/EC
Performance level (per EN ISO 13849-1:2008)
Performance level: PL = C
Category: Cat. = 1
Diagnostic coverage: DC = none
MTTF: > 100 years
Certificates (option)
Available certificates
2.2 test report State-of-the-art manufacturing
Wetted metallic parts
Confirmation of the class and indication accuracy
3.1 inspection certificate Wetted metallic parts
Wetted metallic parts with suppliers' certificate
Confirmation of the class and indication accuracy
List of single measured values
DKD/DAkkS calibration certificate
Certificates, see website
Scope of delivery
Test report
Non-linearity 0.5 % 3 points
Non-linearity 0.25 % 5 points
Non-linearity 0.125 % 5 points
Packaging
Individual packaging (standard)
Multiple packaging (up to 20 pieces)
Instrument labelling
WIKA label lasered (standard)
Customer-specific label on request
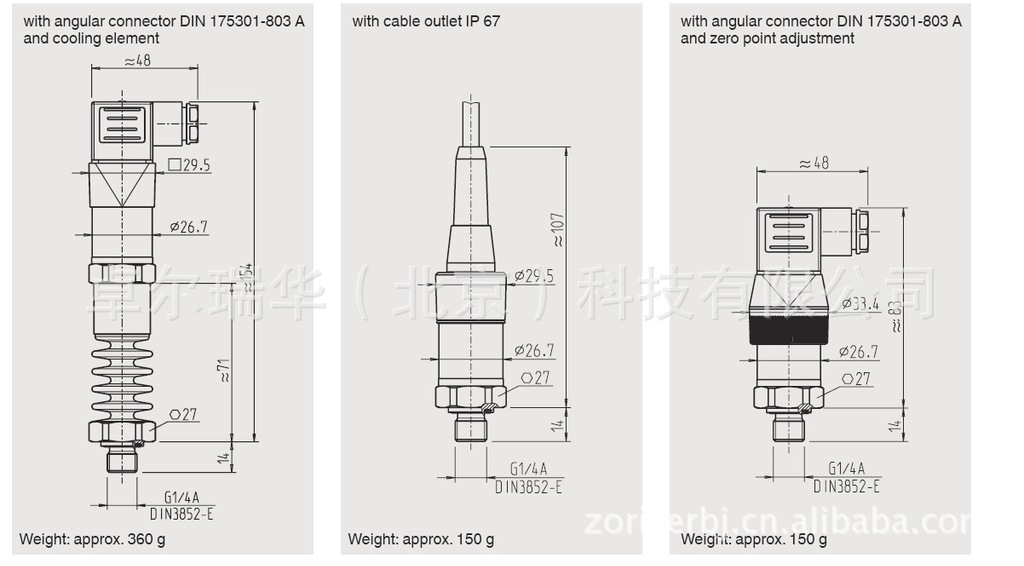
Dimensions in mm
Pressure transmitter model S-20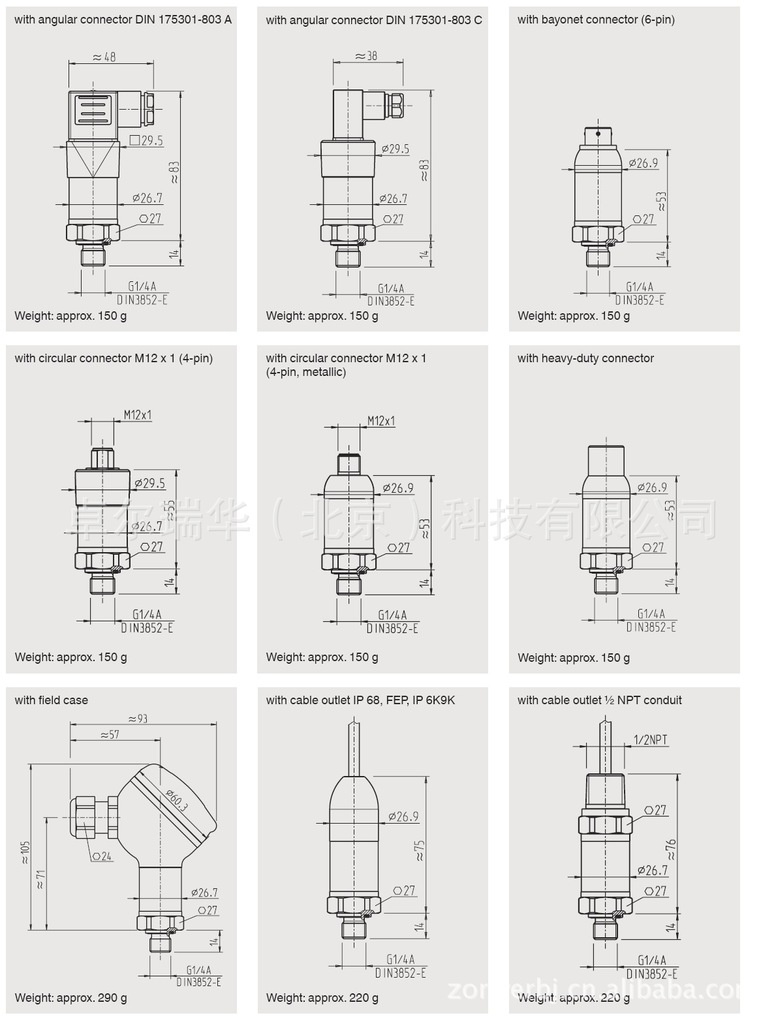
Process connections
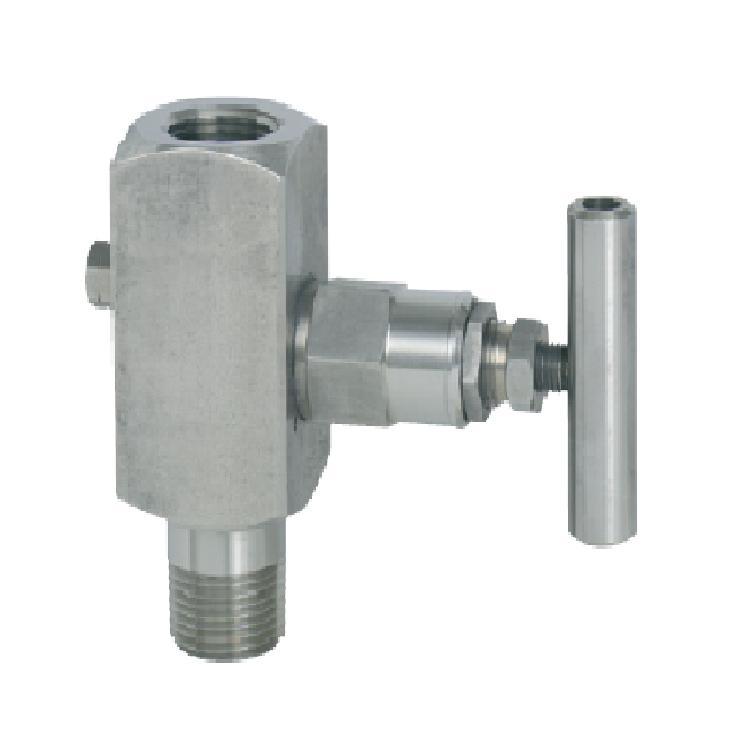
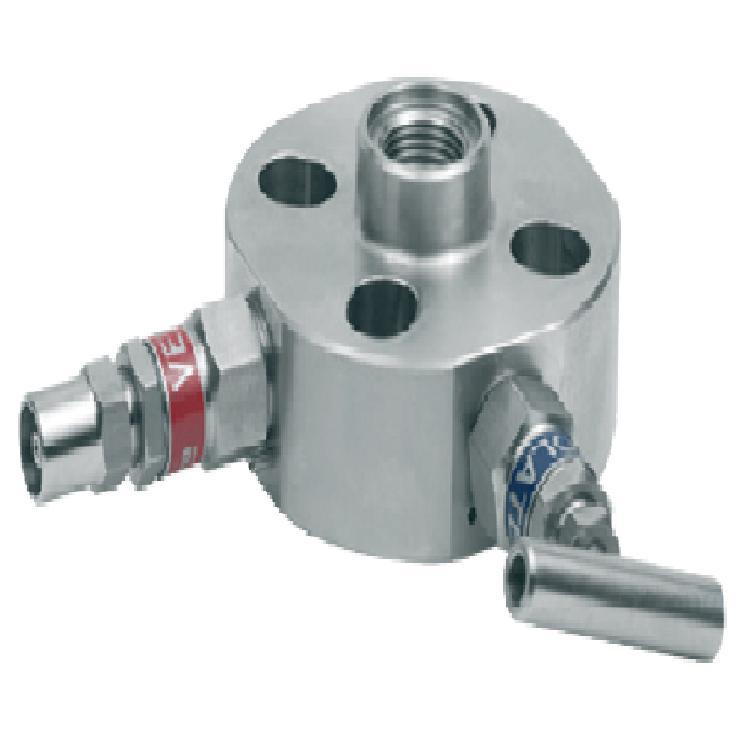
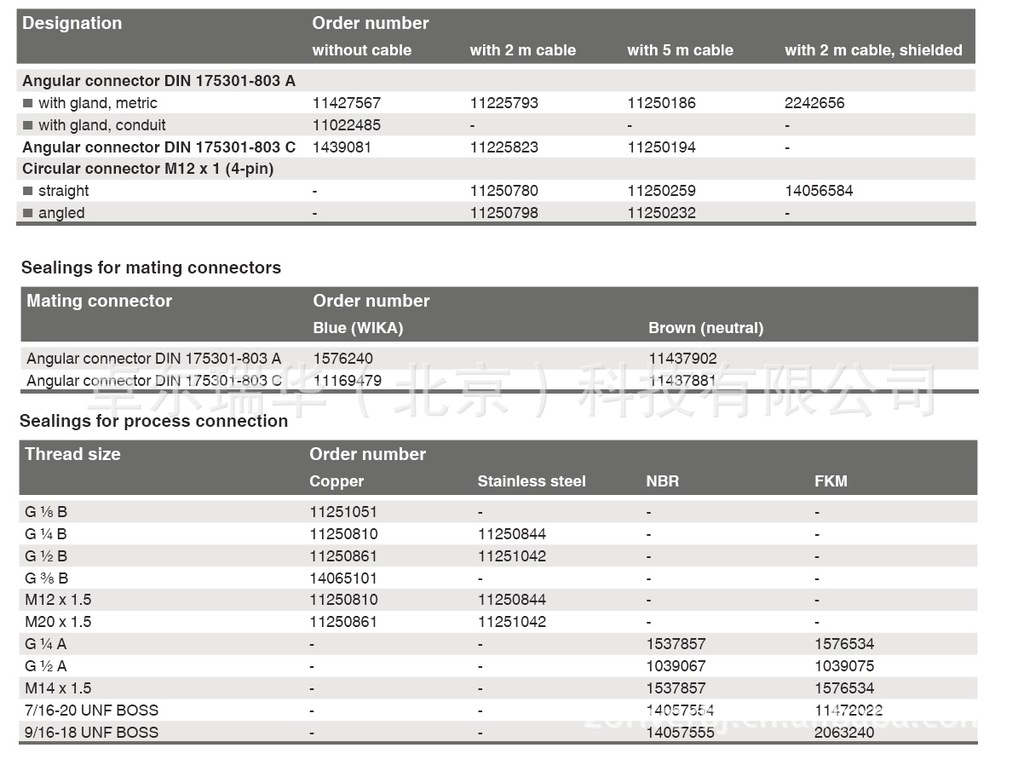
Accessories and spare parts
Mating connector
Ordering information
Model / Measuring range / Overpressure limit / Output signal / Non-linearity / Calibration temperature / Zero point adjustment/ Process connection / Pressure channel / Sealing / Electrical connection / Assembly / Cable length / Shielding / Certificates /Packaging / Instrument labelling / Accessories and spare parts
歡迎致電咨詢定購WIKA S-20 高精度 高壓力范圍 壓力變送器 精度:0.125 1600bar
電話:010-51669912 56291930 15910733293
傳真:010-51669912
QQ:823377546 1491421115 2636968574
公司官網:http://www.zoriver.cn http://www.zoriver.com.cn
批發市場僅提供代購諮詢服務,商品內容為廠商自行維護,若有發現不實、不合適或不正確內容,再請告知我們,查實即會請廠商修改或立即下架,謝謝。

